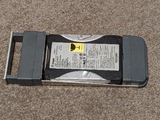
Xserve - A hard disk!
Welp, almost three years after I bought an original Xserve for next to nothing, I finally managed to procure a hard disk caddy for it. After shipping (where I think I got hosed, $17.50 for a padded mailer that weighs all of about 500g tops?) it cost more than the Xserve did, but who cares, I had the fun budget to spare (spoiler: I forgot about buying Diablo 4 next month, so I really didn’t).
 Anyway, it arrived Friday, so after work I threw a 40GB Seagate in it, fired up the OpenBSD 6.7 disc that was still in the drive and set about installing it. Then… it wouldn’t boot. Fucked about a bit trying to get into OpenFirmware in order to “bless” the boot disk, and it stopped booting completely, showing four blinks of the blue LEDs on the front that typically indicates some sort of POST failure.
Fuck.
I tried removing the RAM, the GPU, and the extra NIC, reseating them all, no luck. Someone suggested (as lots of folks do, though I’ve not found any credible evidence it’s the case) that Apple lock these to only work with Apple hard disks, but removing the disk was the first thing I tried.
Next I tried removing the PRAM battery (mainly just to inspect that it was still good and hadn’t pissed everywhere) and I tested it, 3.56V is close enough to the labelled 3.6 that I can conclude there’s nothing wrong with it.
On Saturday, I did a bit more research, plugged a null-modem serial cable in, configured screen to 56700 baud, and upon pressing enter a few times was met with what appeared to be a debugger:
Exception #00003000
FFF801FC 4BFFFFC4 >
No idea what those codes mean. I could step through it, or I could press g to “go”, where it would think for a bit, do another cycle of blue blinkies, then present the same prompt.
This got me thinking that maybe I either had a dead-stick of RAM (I am not buying PC2100 DDR for fuck’s sake, this is a ten-dollar Mac!), or the CPU was unhappy, so I pulled the CPU card out and reseated it, and it worked! With the OpenBSD disc still in the CD-ROM I got the boot console.
Now back to the original problem, getting it into OFW. I tried several times the apparent physical method of (mirrored from here, but it looks like it’s originally copy+pasted from the Xserve User Guide, page 56):
With the power button off, hold in the system identifier button while you press the on/standby button
Continue holding the system identifier button until the top row of blue lights blinks sequentially.
Release the system identifier button. The rightmost light in the bottom row turns on. Press the system identification button to light the next light in the bottom row, moving from right to left. Press the button again to change lights.
The lights in the bottom row indicate (from right to left):
- Light 1 (far right): Start up from a system disk in the optical drive (on a system with an optical drive). This also ejects any disc already in the optical drive.
- Light 2: Start up from a network server (NetBoot)
- Light 3: Start up from the internal drive (leftmost drive if more than one).
- Light 4: Bypass the current startup disk and startup from any other available startup disk.
- Light 5: Begin target disk mode (all drives, including optical drive, will show up)
- Light 6: Restore the systems default setting (reset NVRAM)
- Light 7: Enter Open Firmware (via the serial port if no monitor and keyboard are connected.
- When the light for the action you want is on, hold in the system identifier button for at least 2 seconds, until all the lights in the top row are on.
- Release the button
This did not work for me, at all. I tried several times using the front and rear “identify” buttons. I made sure it wasn’t locked. I tried locking it, unlocking it. I tried it with the case on. It didn’t work. The only thing I can think of is this is for the later slot-loading Xserve, and as mine is the earlier non-slot-loading it does not support this menu?
Anyway, I set about looking for another method, and someone mentioned using the typical Mac method of holding down Option+Cmd+O+F. Well, I don’t have a Mac keyboard, but I found a USB one (a Logitech, $20-ish from Kmart years ago), plugged it in, and I reasoned that the PC equivalents for Option and Command were Alt and Start, so gave that a go and whaddya know:
Apple RackMac1,1 4.4.4f1 BootROM built on 06/22/02 at 00:22:19
Copyright 1994-2002 Apple Computer, Inc.
All Rights Reserved.

Welcome to Open Firmware, the system time and date is: 00:53:44 01/01/1904

To continue booting, type "mac-boot" and press return.
To shut down, type "shut-down" and press return.

 ok
0 > setenv boot-device hd:,ofwboot /bsd  ok
0 > reset-all
erasing fff06000
flashing fff06000
swapping blocks
Side-note: fwoar this machine’s old enough to drink in the USA later this month!
Before I know it, I have it booting from the hard disk, right up until where I’m pretty sure it’s supposed to be starting getty and then… nothing. God damn it, I bet the serial terminal is not enabled. That’s a problem, because the GPU is still not working, so I don’t have any way to see what’s on the screen without the serial console.
Reboot, stop it at the prompt, enter boot -s. Mount / and /usr (the former already mounted, but I needed to remount it read-write), export TERM=vt100 so that vi would start, and I’m able to edit it to enable the terminal on the serial console.
One more reboot, and I’m in business. Now to figure out what to do with 2x 1GHz G4 PPC cores and 512MB of RAM? At the moment, turn it off and put it in the garage because it’s too fucking loud.
